2. VNC Server
Often there is a need to operate the workstation remotely but using various graphical user interfaces (GUIs). As an alternative to XServer or commercial remote control programs (e.g. TeamViewer, AnyDesk, etc.) Virtual Network Computing (VNC) is a viable alternative that can often make life easier. This guide shows you how to install on an Ubuntu system (20.04) the server (which is the machine you want to control) and then use it with a client (RealVNC in this case) on any PC.
Fig. 2.2 A VNC server includes an X server that can communicate with local client programs.
Note
Part of this Guide is an elaboration of the tutorials:
2.1. VNC Server Installation
VNC is a cross-platform tool that can provide remote access to Linux, UNIX, Mac OS X, Windows and other Operative Systems from any type of client. On Linux there are several programs that allow your computer to become a VNC server, in this guide we install one of the most used TightVNC.
Update everithing
$ sudo apt update && sudo apt upgradeInstall the VNC server client TightVNC server
$ sudo apt install tightvncserver tigervnc-standalone-server
Warning
Please make sure that you are using only vnc-server and no other VNC-server are installed as this could give errors in future mostly that clipboard sharing between the host Ubuntu Server & vnc-client machine. You can check it as follows:
$ dpkg -l | grep vnc
2.2. Install desktop environment (DE)
In addition to VNC, the desktop environment (DE) must be installed, which is necessary to be able to reproduce the entire interface and manage the GUIs of the applications. In the linux mode there are several options, so it’s up to you. Here we propose 3 possible options, from the simplest DE to the most aesthetic.
XFCE is probably the fastest and lightest, while being visually appealing and easy to use DE.
Install XFCE DE
$ sudo apt install xfce4 xfce4-goodies
GNOME 3 is the default desktop environment on many major Linux distributions including Fedora, Debian, Ubuntu, etc.
Install GNOME DE
$ sudo apt install ubuntu-gnome-desktop
Deepin DE was described as “the single most beautiful desktop on the market” by Jack Wallen writing for TechRepublic. We are going to use the Ubuntu Deepin DE since Ubuntu is the operating system of our workstation.
First add UbuntuDDE PPA
$ sudo add-apt-repository ppa:ubuntudde-dev/stable
Update the
aptrepository$ sudo apt update
Install UbuntuDDE
$ sudo apt install ubuntudde-dde
2.3. Set up VNC session for each user
To avoid interference between different users, the server must be set up for each user.
We will assume that on our machine there are 3 users test1, test2 and test3.
Warning
Please note, you are accessing the machine as several users using super user permissions. So be very careful and avoid doing any damage!
Login to
test1using the root privilages.$ sudo su # loging as super user$ su - test1 # loging as test1Now initiate the vnc configuration for
test1. This will create the hidden folder.vncwith all the default configuration files.$ vncserver You will require a password to access your desktops through VNC Clients. Password:****** Verify:******
You will be asked for the VNC server password – type your password. And for the “view-only” password, you can enable or disable it. The user who logins to the server using the “view-only” password will not be able to control the mouse and keyboard.
Now we kill the server that we just start:
$ vncserver -kill :*
Change the configuration file.
$ cd $HOME/.vnc
$ vim xstartup
Inside the file copy and paste the following lines according the choose Desktop Environment.
 1#!/bin/bash
 2unset SESSION_MANAGER
 3unset DBUS_SESSION_BUS_ADDRESS
 4export XKL_XMODMAP_DISABLE=1
 5export GTK_IM_MODULE=fcitx
 6export QT_IM_MODULE=fcitx
 7export XMODIFIERS=@im=fcitx
 8
 9#__using_dde__
10session=startxfce4 # XFCE=startxfce4 GNOME=gnome-session DeepinDE=startdde
11
12#__enable_clipboard_sync__
13if [ -f /usr/bin/autocutsel ]
14then
15    /usr/bin/autocutsel -fork
16fi
17
18#__deepin_uos_activator__
19if [ -f /usr/bin/uos-activator ]
20then
21    /usr/bin/uos-activator &
22fi
23
24#__enable_fcitx__
25if [ -f /usr/bin/fcitx ]
26then
27    (sleep 15 && /usr/bin/fcitx) &
28fi
29
30#__kill_user_apps_duplicated__
31killall -9 v2ray &
32
33exec dbus-launch $session
1#!/bin/sh
2# Start Gnome 3 Desktop
3[ -x /etc/vnc/xstartup ] && exec /etc/vnc/xstartup
4[ -r $HOME/.Xresources ] && xrdb $HOME/.Xresources
5vncconfig -iconic &
6dbus-launch --exit-with-session gnome-session &
 1#!/bin/bash
 2unset SESSION_MANAGER
 3unset DBUS_SESSION_BUS_ADDRESS
 4export XKL_XMODMAP_DISABLE=1
 5export GTK_IM_MODULE=fcitx
 6export QT_IM_MODULE=fcitx
 7export XMODIFIERS=@im=fcitx
 8
 9#__using_dde__
10session=startdde # XFCE=startxfce4 GNOME=gnome-session DeepinDE=startdde
11
12#__enable_clipboard_sync__
13if [ -f /usr/bin/autocutsel ]
14then
15    /usr/bin/autocutsel -fork
16fi
17
18#__deepin_uos_activator__
19if [ -f /usr/bin/uos-activator ]
20then
21    /usr/bin/uos-activator &
22fi
23
24#__enable_fcitx__
25if [ -f /usr/bin/fcitx ]
26then
27    (sleep 15 && /usr/bin/fcitx) &
28fi
29
30#__kill_user_apps_duplicated__
31killall -9 v2ray &
32
33exec dbus-launch $session
Make the file executable
$ chmod +x xstartup
Repeat all the step for all the users (eg. test2)
Note
If you what to chage the VNC server password you can use the following command:
$ vncpasswd
2.4. Running VNC as a Service at startup
With this step we will make crate a systemd service that will start the VNC server at each boot.
Even this step has to be repeated for each user.
Make the
Unitfile.$ cd /etc/systemd/system$ sudo vim vncserver_test1.service # This is for the ``test1`` usercopy and paste the following:
 1[Unit]
 2 Description=Remote desktop service (VNC)
 3 After=syslog.target network.target
 4
 5[Service]
 6  Type=forking
 7  User=USER
 8  PIDFile=/home/USER/.vnc/%H:PORT.pid
 9  ExecStartPre=-/usr/bin/vncserver -kill :PORT > /dev/null 2>&1
10  ExecStart=/usr/bin/vncserver -depth 24 -geometry 1980x1080 :PORT
11  ExecStop=/usr/bin/vncserver -kill :PORT
12
13[Install]
14  WantedBy=multi-user.target
replace
USERwith the user name (eg. test1) andPORTwith a sequential number. Below an example:1[Unit] 2 Description=Remote desktop service (VNC) 3 After=syslog.target network.target 4 5[Service] 6 Type=forking 7 User=test1 8 PIDFile=/home/test1/.vnc/%H:1.pid 9 ExecStartPre=-/usr/bin/vncserver -kill :1 > /dev/null 2>&1 10 ExecStart=/usr/bin/vncserver -depth 24 -geometry 1980x1080 :1 11 ExecStop=/usr/bin/vncserver -kill :1 12 13[Install] 14 WantedBy=multi-user.target
Warning
The number choose for
PORTwill correspond to the last number of the port where the VNC server will listening. For example ifPORTis 1, the VNC server will be listening on port 5901.Reload and start the service.
sudo systemctl daemon-reload
sudo systemctl start vncserver_test1.service
Assuming everything goes error-free, add the service to the boot time and check the service status using systemctl.
sudo systemctl enable vncserver_test1.servicesudo systemctl status vncserver_test1.service
Repeat all the step for all the users (eg. test2)
Now the VNC server is set and it is listening for one port per each user, you can restart the machine and check if the service start at the startup correctly.
2.5. Connect to the VNC Server Through SSH Tunnel
Open the SSH Tunnel.
Open your terminal and type the ssh command as below
ssh -L 5901:localhost:5901 -N -f test1@denerg33078.polito.itNote
With this command the port 5901 on local computer is connected with the 5901 of the server. Note that we connect with the
USERtest1, therefore we connect the port 5901 since we setPORTas 1 in thevncserver_test1.service.Download and install the VNC client, we are using RealVNC Viewer.
Set the defoult qulity to
High.Open RealVNC Preferences
File > Preferences...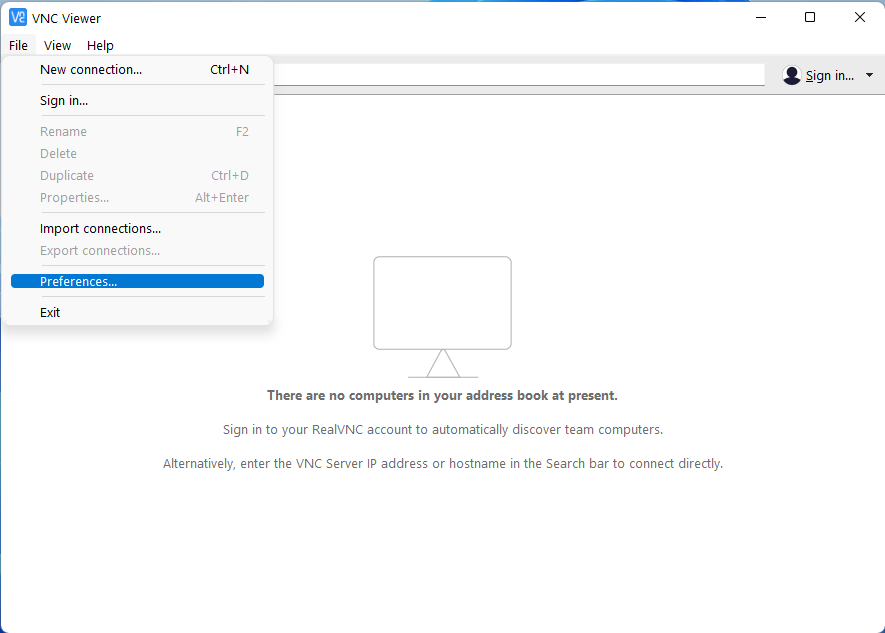
Fig. 2.3 RealVNC: Preference
#. Go to the
Expertpreference, scroll the list until you find theQualityentry and change the values fromAutotoHigh(Expert > Quality > Value: High).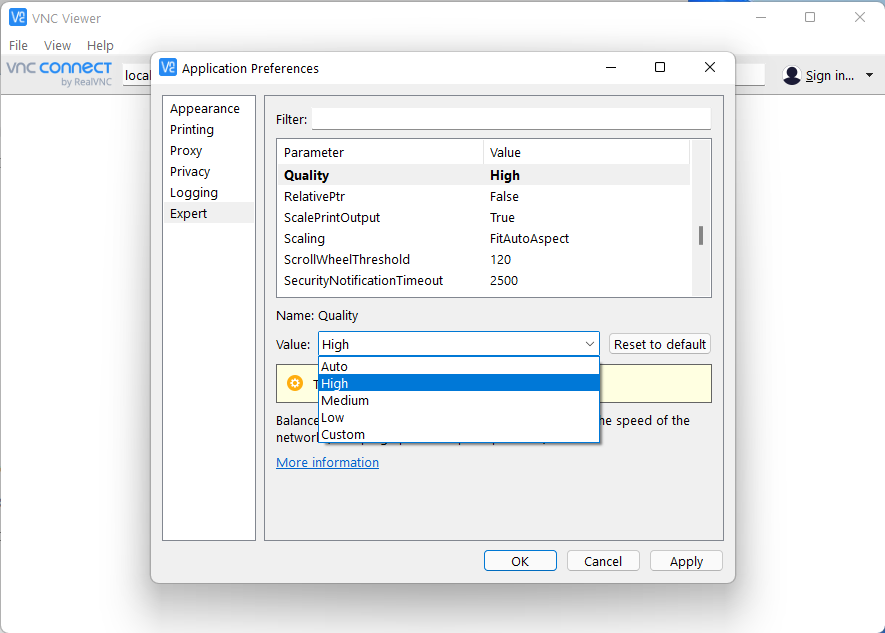
Fig. 2.4 RealVNC: Expert dialogue window
Click on the button
OKand close the preferences window.
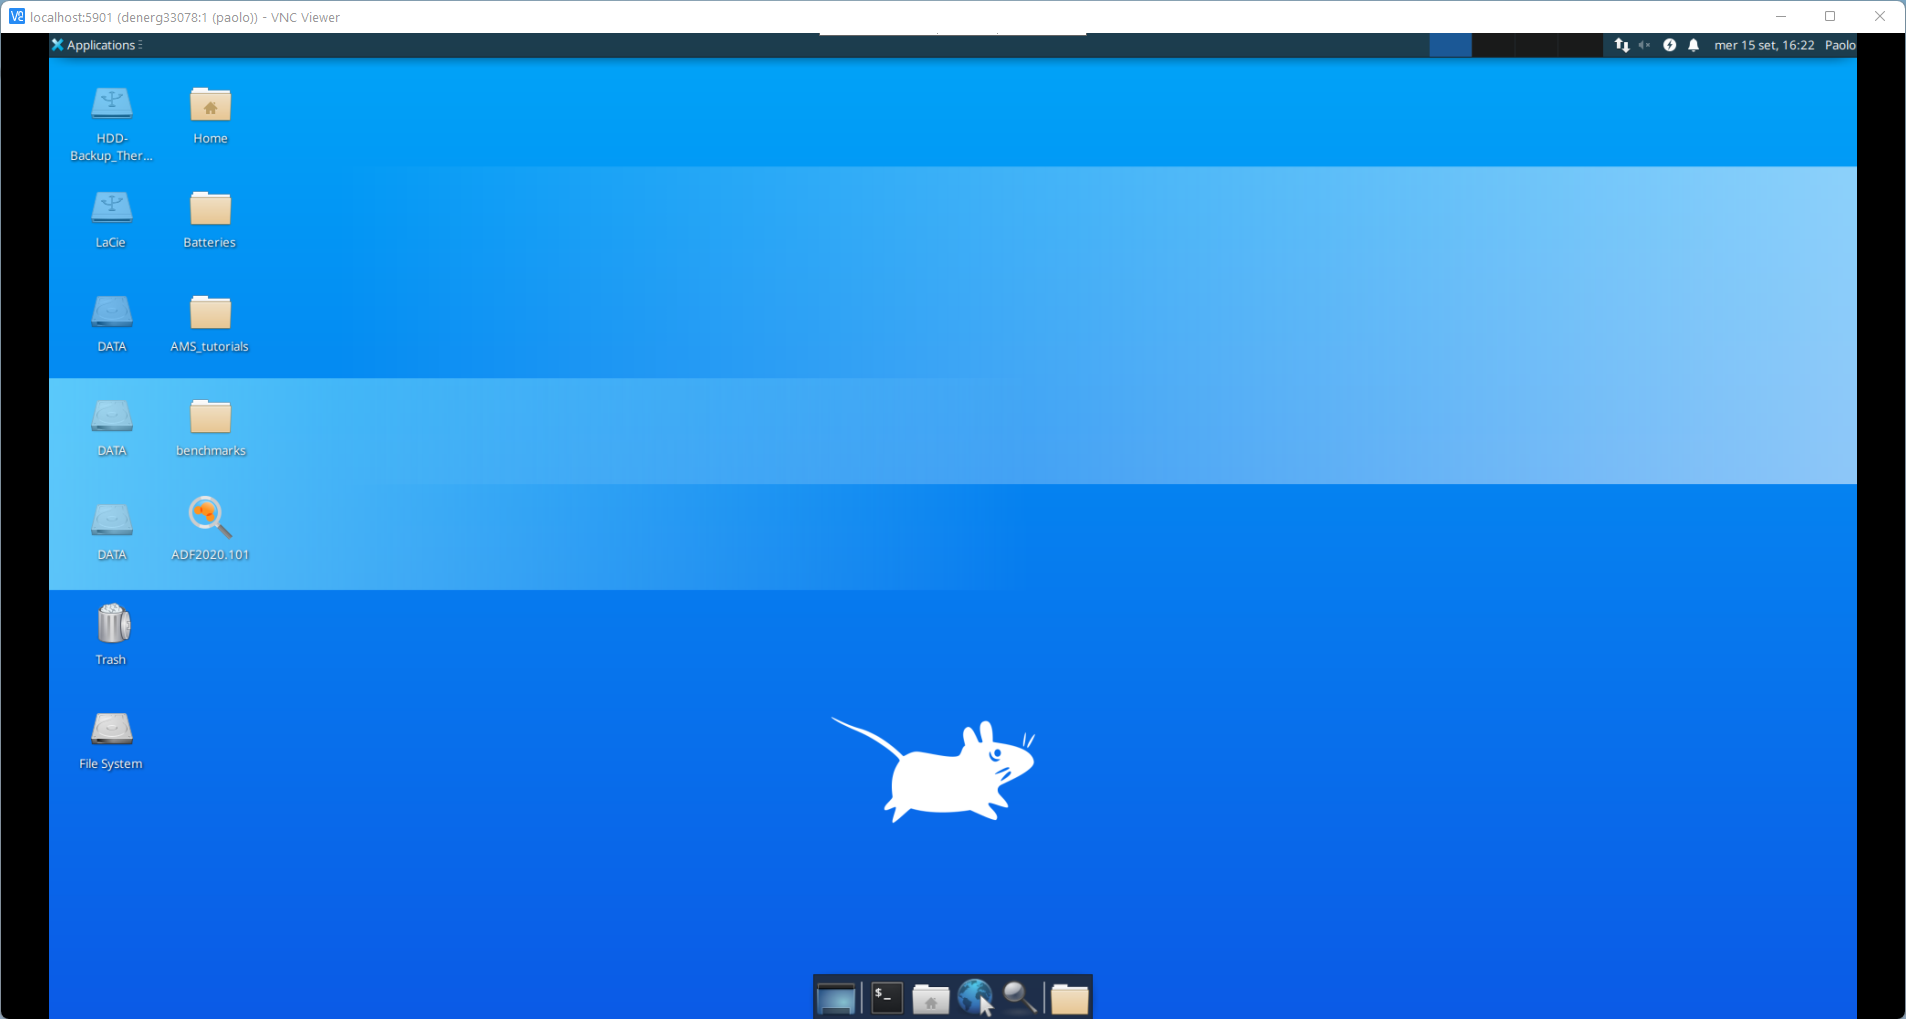
Connect to the VNC server.
Type on the upper bar the andress and press
ENTER.localhost:PORT
Where
PORTis the user VNC server port, e.g for the usertest1is5901, (therfore it will belocalhost:5901)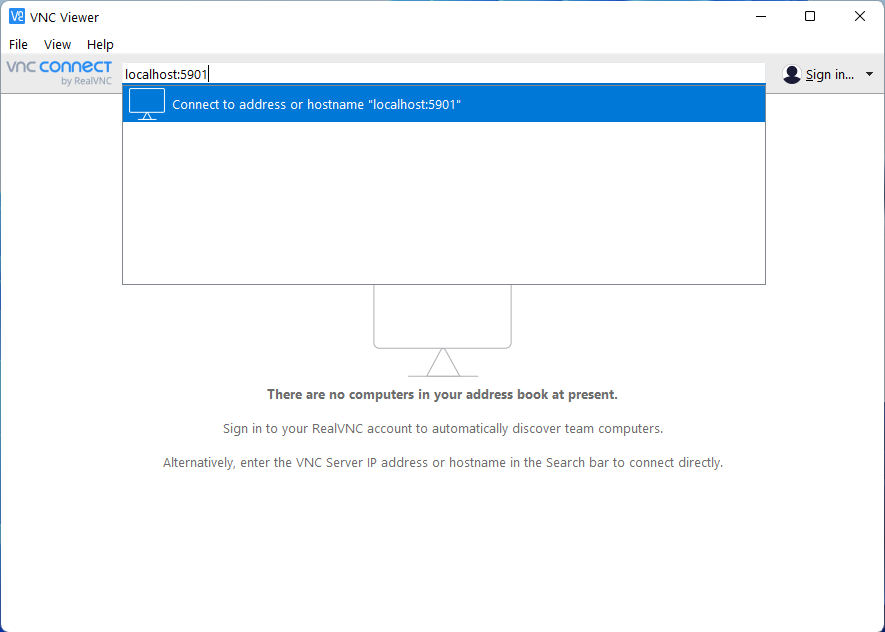
Fig. 2.5 RealVNC: Server andress
Type the VNC server password, that you set during the set up of the VNC session
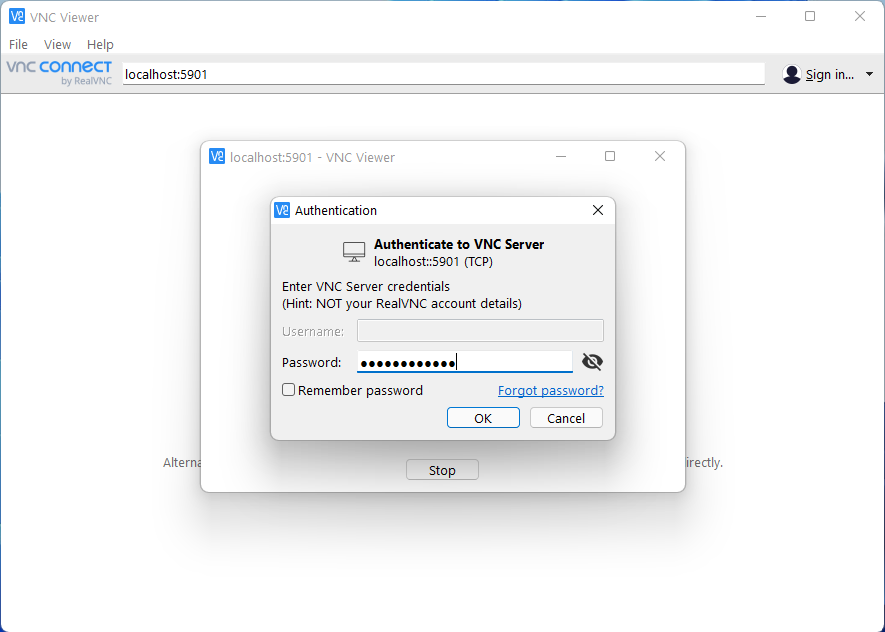
Fig. 2.6 RealVNC: Authentication pop-up
Warning
VNC will show a pop-up warning questioning the security of the connection. This happens because it does not recognize that we are using SSH (Secure SHell) tunneling to connect the two computers. Ignore it! The connection is secure because the SSH protocol encrypts all messages.
ENJOY IT!